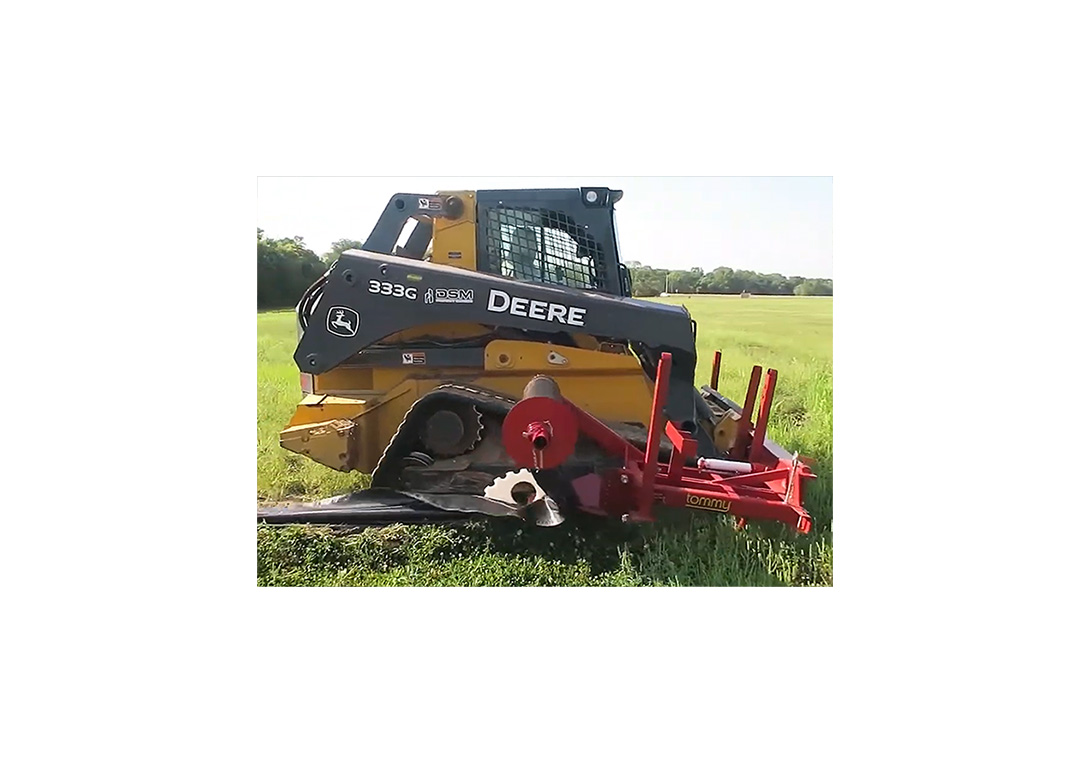
ELT-200
Elston Push & Pull Silt Fence Installer | Univ. Skid Mount
$4,595.00
Weight: 570lbs
Elston Silt Fence Installation Machine
The Elston Silt Fence Machine is the original slicing technology, patented for its engineered solution resulting in fast, quality installation. Others, like the “silt fence plow”, attempt to copy Elston’s results, but fall short in their endeavors. Contractors want to know the difference between the Elston silt fence machine and silt fence plows.
- Universal Skid Mounted
- 60+ HP Vehicles
- Vehicle Must Have Tracks n nearly all situations because the requirement for traction and torque are so great.
- outperforms silt fence plow equipment
- outperforms silt fence trenching equipment
- slices through the saturated soils, rocky soils and hard clay
- conditions the soil for future compaction
- smoothly inserts silt fence fabric 8-12 inches deep
- effective in difficult weather and conditions
- effective in tight quarters
- effective on uneven slopes
The Elston Difference
Elston Slices through the soil disrupting it upwards, creating a pliable soil condition that secures the fabric in the slice. This prevents the fabric from being pulled out of the slice when turning or traversing a water way. This is critical because other slicing methods horizontally compact the interior of the slice outward, creating a soil condition that allows the fabric to easily slide out, thus causing significantly more labor and machine downtime to reinstall the fabric. All this in one proven, trouble-free operation.
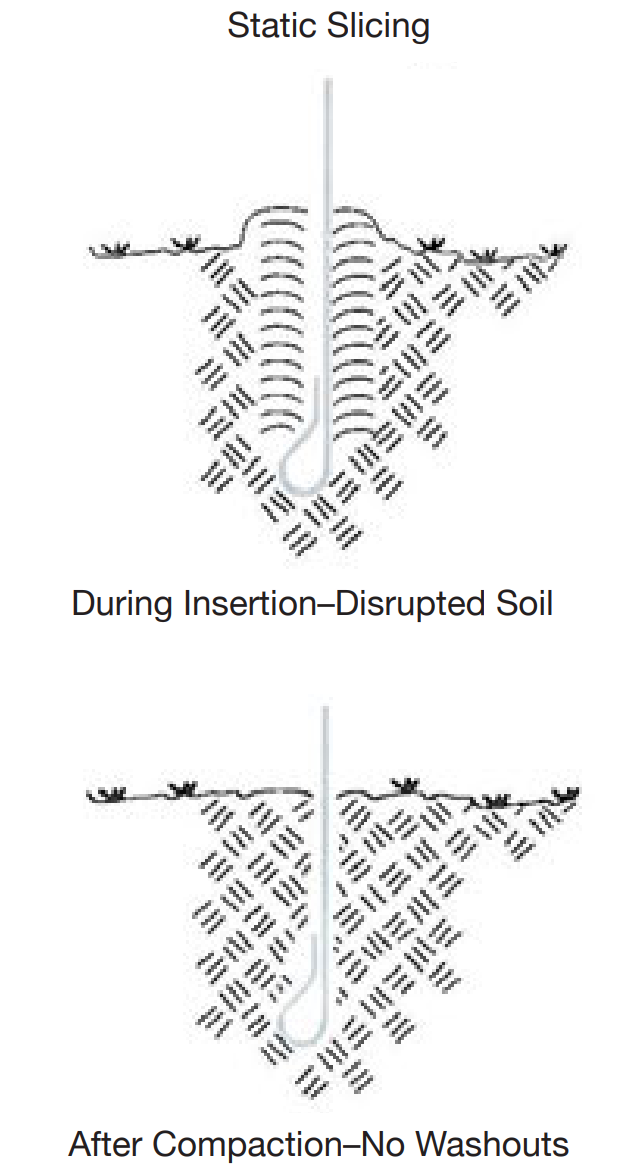
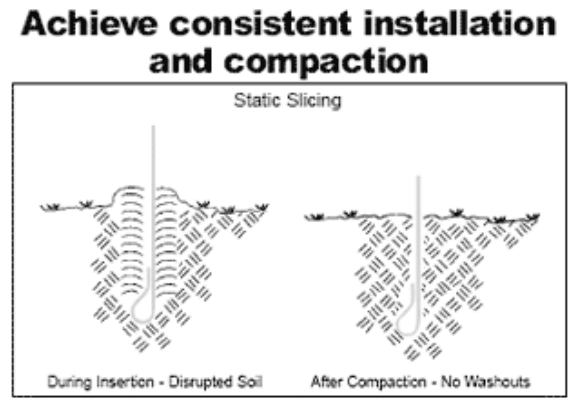
No Washouts. The Elston slices through the soil, uniquely designed to slightly disrupt soil upward and avoid horizontal compaction. Because soil is only disrupted, and not displaced, its profile is maintained as it’s compacted, insuring greater stability, and greater resistance to wash out
Best of all, the Elston turns easily to avoid obstacles and creates “smiles” to contain runoff. The Elston actually slices through most obstacles, even eight inch thick cobble and concrete waste, by pushing it to one side. However, if you do snag a hard buried object, the Elston is protected by a grade 5 shear bolt to prevent damage to the machine.
The Elston silt fence machine is pulled through the soil with a tractor (30 H.P. utility or larger) or a skidloader with tracks (60 H.P. or larger). The process is called static-slicing because no other energy is applied to the soil disrupter, which literally slices through the soil, slightly pushing soil or debris to one side or the other.
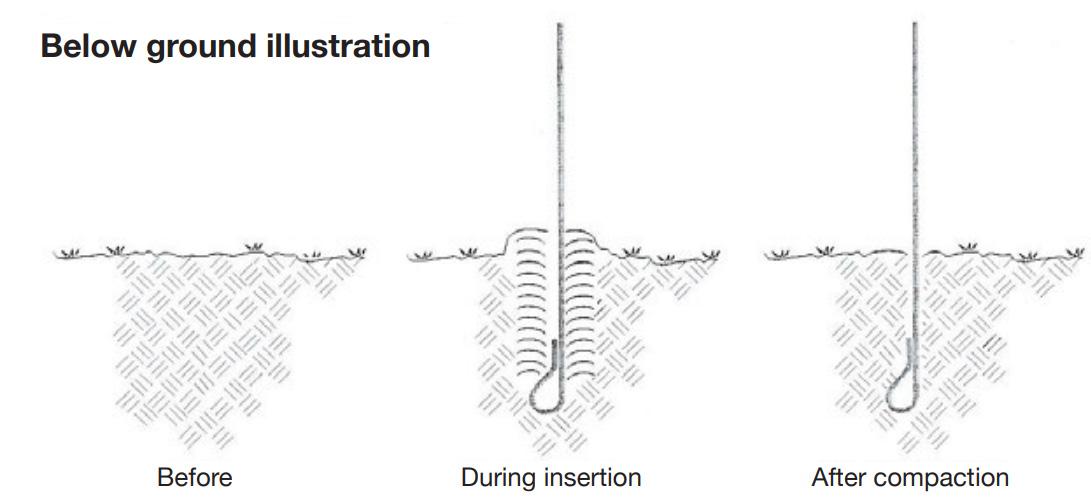
The slicing method process uses a soil disrupter to thinly slice through the soil 8-12 inches (200-300m) deep. A vertical wheel then inserts silt fence into the slit. The soil disrupter utilizes a chisel type horizontal point to slightly disrupt soil upward, minimizing horizontal compaction, thus creating an optimum soil condition for future mechanical compaction.
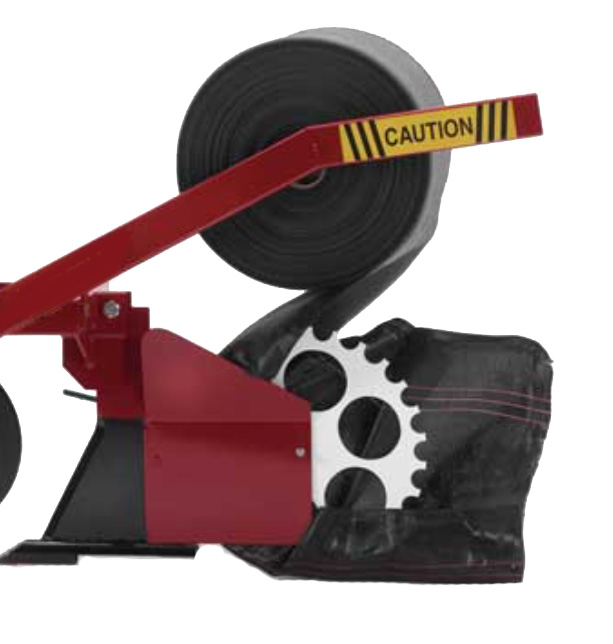
The vertical wheel, positioned between two narrow parallel panels, is a moving pivot where the horizontal silt fence fabric is converted to a vertical position between the panels.
In this dynamic operation, silt fence fabric is simultaneously pulled off the roll by the vertical wheel, funneled into the apparatus, converted to a vertical position between the panels, and inserted into the soil being held open by the panels. As the machine progresses, soil collapses onto the silt fence fabric, thus securing silt fence in the desired position.
No matter in water-saturated soils, steep slopes, tight circles, windy conditions, or hard pan, the mechanical installation is consistent and dependable every time.
After installing the fabric, the power source wheel rolls the disrupted soil down against the fabric to create a compacted soil condition which strongly resizes washouts.
This technology slices through the soil, rather than excavating it. Excavation is extremely time consuming; the time is doubled again when you backfill in the dirt you excavated. If the excavated material is sod or cobble, the operation is even more time consuming, and may not enable proper compaction. Now required by ASTM, compacted soil resists water infiltration and moisture saturation, thus nearly eliminating washouts.
The Soil Disrupter
The horizontal chisel point helps to pull the machine into the correct ground depth and helps it maintain that depth. It also disrupts the soil upward, usually with minimal displacement. You do not have to push it into the soil; it pulls itself in!
This is critical for two reasons. One, just slicing the soil with a blade, like a vibratory plow, compacts the soil horizontally, preventing the soil from collapsing onto the fabric and retarding its ability to be compacted tightly against the fabric — extremely critical! A vibratory plow installation is not acceptable. In addition, running the chisel point deep in the ground, possibly 18” deep, may not disrupt the soil upward — it could act similarly to the vibratory plow and compact the soil horizontally.
Two, disrupting the soil upward creates an optimal condition for mechanical compaction, especially wheel-rolling with the power source. Minimal time, labor and equipment are required for compaction — both critical factors in contractor adherence to the specifications.
Minimal soil disruption and displacement maintain some of the soil’s original profile enabling compaction back to its original state, insuring greater soil stability, and thus greater resistance to washout.
Minor disruption minimizes soil moisture loss during fence construction, which also contributes to high relative compaction.
The slicing method nearly eliminates washouts. The word nearly is used because other factors such as the machine operator, the weight and repetitions of compaction, trash in the soil, soil structure, and moisture can all effect the outcome.
Lifetime Warranty on Plastic Wheel
The Wheel Guarantee
The Elston wheel is guaranteed for the life of your machine to the original buyer, and at a maximum of one per year – although most wheels last many years due to the fact that they are 2 inches above the operating depth of the machine and the only stress on a wheel is the moving silt fence fabric.
Why A Guarantee?
The wheel has never been a problem (so a warranty wasn’t necessary) and is not now, but false insinuations from others have caused us to address these comments with a full year’s guarantee for a single wheel. Wheels typically last in excess of 100,000 linear feet of silt fence and are only replaced as some contractors prefer a new wheel.
Made and manufactured in America’s heartland, each Elston is backed by a 90-day Full Machine and Freight Warranty. This machine will not let you down. No Elston has ever been returned for quality repairs or a warranty issue.
It does what we say it will and contractors love it! Each month we get unsolicited calls from ecstatic customers telling us “I didn’t believe it was this good!”
Proven Effective
Proven in Every Soil Type
The Elston has been proven effective in every soil type, even the most difficult such as saturated soils, rocky soils, and hard, baked compacted clay. The Elston operates in the most difficult weather and terrain conditions, such as high winds and steep slopes.
With the Elston you can install silt fence, regardless of the weather or soil conditions, and move onto the next job––knowing the work has been done professionally and will meet all ASTM standards.
Non Issues
Wet conditions make trenching nearly impossible, costing you work days and income, that are gone forever.
Windy days making it impossible to build a tight fence, cause havoc with employees, morale and production.
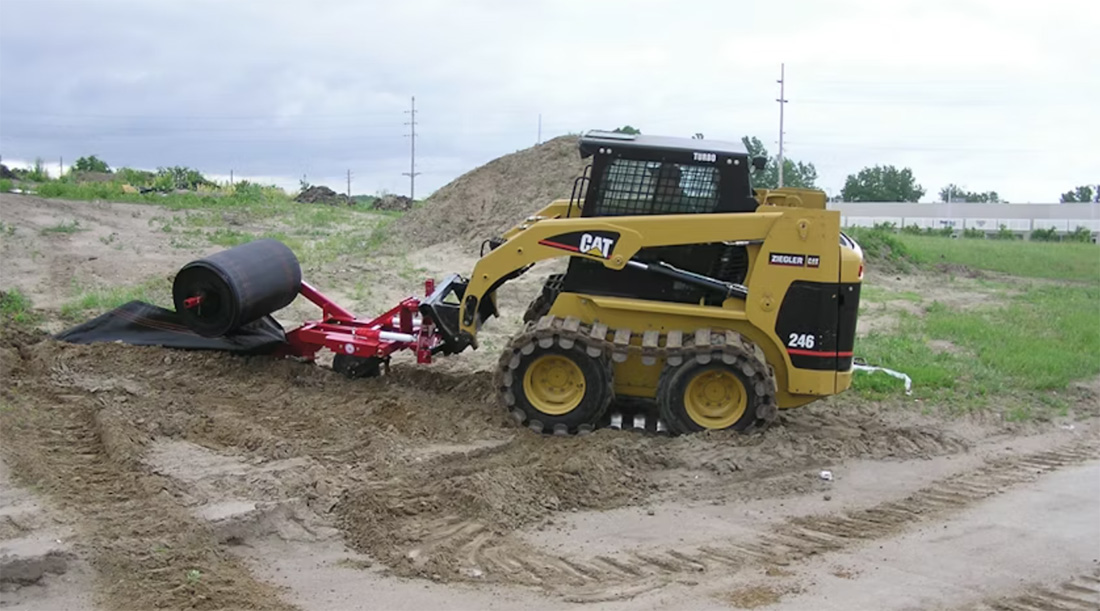
Installing The Elston On A Skid Steer
Installation is basically the same as with a tractor, except the operator has much greater control of the process. The Elston is pulled by a tractor and basically floats through the soil. The skid-loader has the capability for downward pressure and thus the potential for very bad and very good results.
A skid-loader must have tracks and at least 60 H.P. in nearly all situations because the requirement for traction and torque are so great.
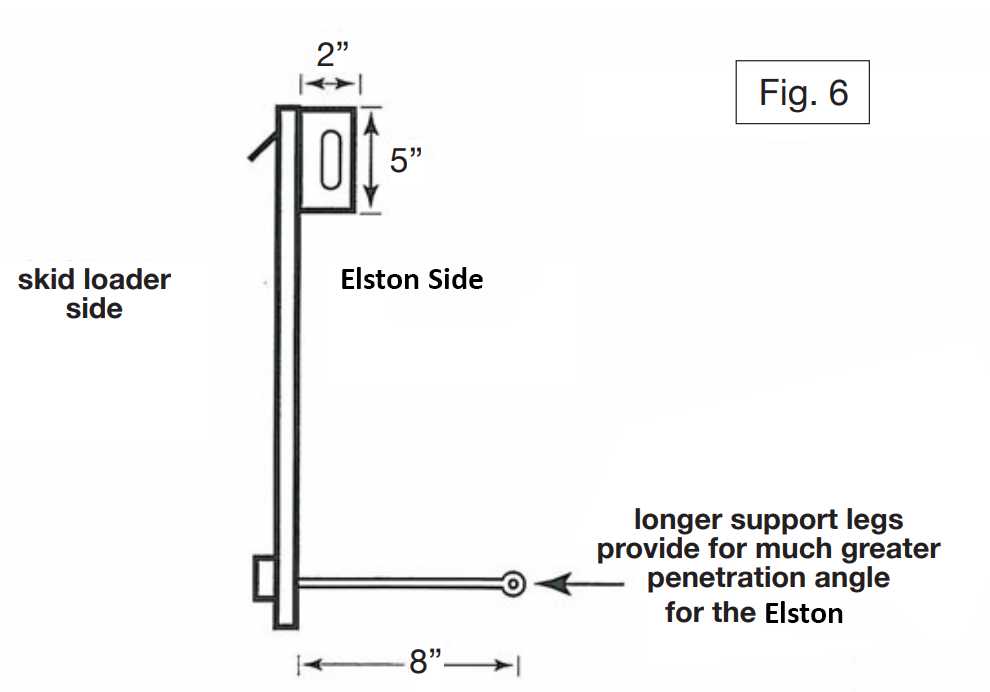
A skid-loader works great for ditch checks because the cylinders give it a large range of motion for different slopes. In cases where a skid-loader can not retract enough for the Elston to install in a head-on slope, an adapter plate engineered as shown is recommended to facilitate those situations. See Fig. 6 below.
Check Installation Before Compacting
The operator needs to survey the installation before compacting the soil against the silt fence, to confirm proper installation. Have the support person walk along and check the fabric for proper consistent height. It is easier and faster to fix a small area when the soil is loose rather than when compacted. J-hooks and tight curves are especially sensitive because they are often installed in high pressure areas. Proper compaction and adequate depth are critical to the successful operation of the silt fence.
Importance Of Compaction
Insufficient compaction can allow water that has dammed up behind the silt fence to develop a channel underneath the fence and flow up on the downside of the silt fence. We recommend having your loader bucket full of soil and driving over critical water retention areas twice on each side of the silt fence, beginning with the upstream side of the silt fence. Sometimes, it is mandatory to go over the area twice in hard, compacted or rocky soils because the soil breaks up in chunks, and it takes repeat trips to reach the necessary compaction level.
Recently updated in 2003, ASTM D6462-03 on silt fence materials and installation requires compaction to be at least 50% of the insitu soil. To facilitate compaction, the specification also better defined the trench to be level full after compaction. As this updated specification is implemented, trenching will become economically unfeasible.
Can Carry Approx. 3,000 LF Of Std Weight Silt Fencing
The Elston can carry approx. 3,000 LF of STD weight silt fence material.
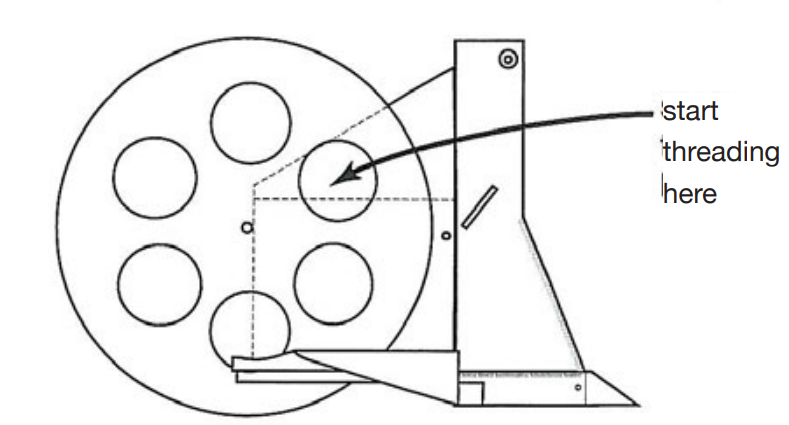
The Elston is available for standard 36” x 1500’ to 2500’ rolls of silt fence, but it can be easily adapted for smaller and larger rolls. The roll fits over the pipe with the top of the silt fence material (if there is a top and bottom) positioned away from the arm of the Elston. The plate and spring come attached for your convenience. Minimal tension is recommended to restrict the roll from free-wheeling. For very large rolls it might unroll easier if the fabric is coming off the back of the roll rather than the front of the roll. To thread the fabric through the machine, put your fingers through a hole in the wheel near the top, clasp the bottom of the fabric so that approximately 6” is behind the wheel, and pull the fabric down around the outside of the wheel and through the machine so that the flap of the inside of the wheel is approximately 6” long and the balance of the fabric is on the side nearest you.
Once you get more proficient it is not necessary to open the hinged wing to pull the fabric through. After the fabric is threaded out the back, it is a good idea to check the fabrics’ position in relation to the wheel, so that the flap is approximately 6” long on the inside of the wheel. The position of the fabric on the front edge of the wheel is critical. You must position the 6” flap as described and shown to insure proper installation and operation of the Elston. Be very careful to avoid pinching or binding the fabric when closing the winged panel.
When you run out of fabric in the middle of a run, you can raise the Elston out of the soil, back up a few feet behind the installed fabric, load the Elston, drop back into the slit next to the existing fabric, and continue on with a perfect splice. Do not splice in critical water retention areas
Support Person
We have found that you waste less fabric and have better control over the operation if you utilized a second person. The support person can position and hold the silt fence to get it started in the slit, walk along the Elston, watching for proper depth, removing debris that comes up, and watching/managing the fabric flow through the machine to minimize snagging and the potential for fabric sliding off of the wheel.
How It Works
The Elston machine installs silt fence the same way – the correct way – each and every time.
It Does Not
- get tired
- skip a step in the process
- fail to follow instructions
- decide not to come to work.
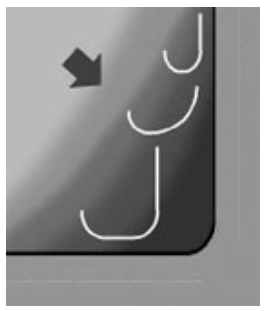
The Elston easily maneuvers around construction site contours and obstacles, properly placing silt fence for detaining sediment-laden water. With the capability to turn 90 degrees within 10 feet, the Elston can easily create a J-hook to detain water – now prescribed and required by many regulatory agencies.
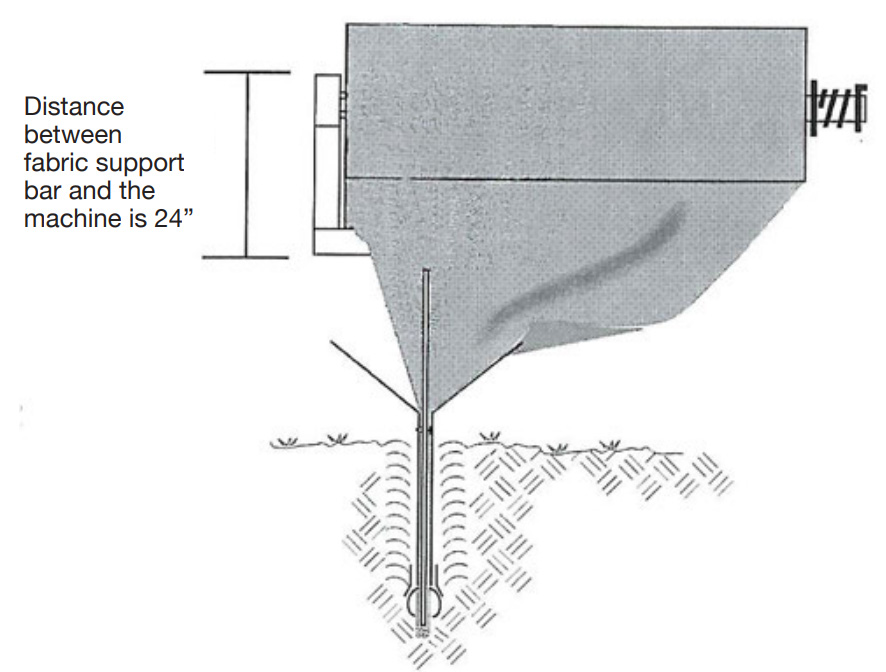
The Elston is comprised of a soil disrupter that slices thinly through the soil 8-12” deep, and an apparatus for inserting silt fence fabric. The soil disrupter utilizes a chisel type horizontal point to disrupt soil upward causing minimal displacement and minimal horizontal compaction, thus creating an optimum soil condition for future mechanical compaction. The apparatus is primarily comprised of a ground-driven vertical wheel, positioned between two narrow parallel panels, acting as a moving pivot point where the horizontal silt fence is converted to a vertical position between the panels. In this dynamic operation silt fence is simultaneously pulled off the roll by the ground-driven vertical wheel, funneled into the apparatus, converted to a vertical position between the panels, and inserted into the soil being held open by the panels. As the machine progresses, soil collapses onto the silt fence, thus securing silt fence in the desired position.
The silt fence material is converted to the vertical position by the wheel engaging the horizontal silt fence fabric perpendicularly and causing it to fold as it flows between the panels and pivots against the wheel. The fabric maintains the same position in the soil, one flap of the fold being approximately 6” long, with the balance of the silt fence as the other flap.
Minimal soil disruption creates an optimum condition for mechanical compaction, which in turn stabilizes the soil against washout under the silt fence. Disrupting soil upward also reduces horizontal compaction. Horizontal compaction would not allow the soil to fall back onto the fabric nor secure the fabric tightly in the soil.

New Rules. Maximum length of any run should be 200 linear feet. Create multiple storage area for ponding stormwater. Trenchers cannot perform the new installation requirements.
Silt Fence Placement
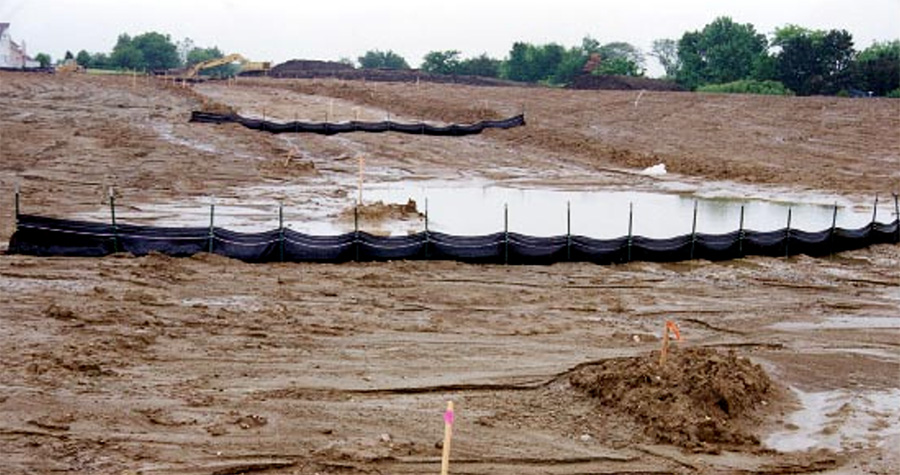
Designs called J-hooks insure water & sediment pond behind each silt fence.
Easy turning also means maneuvering around obstacles on the construction site, and stability on slopes and tight areas. The Elston can be operated in many more locations than a trencher – again with significant time – savings and effective installations.
A rule of thumb might be that if you can’t install with a Elston, it isn’t an appropriate location for silt fence.
Why Is My Silt Fence Is Pulling Off The Wheel?
This usually happens when the operator allows the Elston to float up, or the wheel is not operating at the bottom of the slit. If the support person is walking along and managing the 6” flap of fabric so it stays consistent on the wheel, the Elston should do an excellent installation. When the fabric comes off of the wheel in the middle of a run, you can either cut the fabric and splice it the same as an end of roll splice, or you can back up, rethread the fabric onto the wheel, drop the Elston back into the slit, and proceed hoping to maintain a good installation– it may take a couple of practice runs to get the process down. If you have continuous problems with the silt fence sliding off of the wheel:
• Check that the roll is free and not in a bind of some kind.
• Check that the roll is up against the arm so you are maintaining a full 6” flap on the inside of the wheel.
• Check for debris or something snagging the fabric between the panels.
Installing Silt Fence Through A Ditch
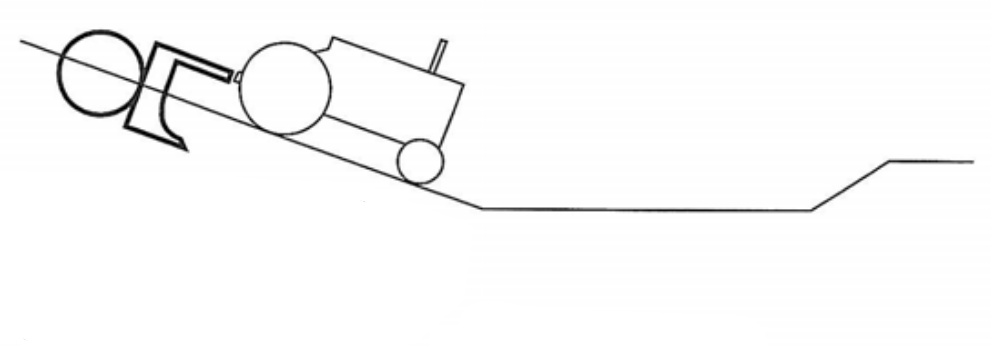
The Elston frame should stay parallel with the ground under it and then be adjusted as the blade and wheel go through the toe of the slope or the crest of a ditch. The operator must watch both of these critical areas while installing ditch checks or going through slight valleys. The lower arms should be released to the completely down position so the Elston continues to pull itself into the soil. The down pressure should be managed so the wheel stays at the bottom of the slit.
Stay parallel until wheel passes through target area
When installing ditch checks, survey the slopes and choose the slope with the most consistent length of slope to start installation, even if it is the greater slope of the two. In other words, try to start the installation with the Elston on the same plane as the skid steer.
Start here because slope has the most consistent length of slope which allows the tractor to get the Elston started easier and better.
When going over the crest of a ditch, as the skid steer back end levels out, the Elston on the front of the skid steer will automatically come up, thus raising the soil disrupter and wheel out of the slit. So it is best to plan your installation process with this restriction in mind.
Installing Silt Fence Through A Deep Rut
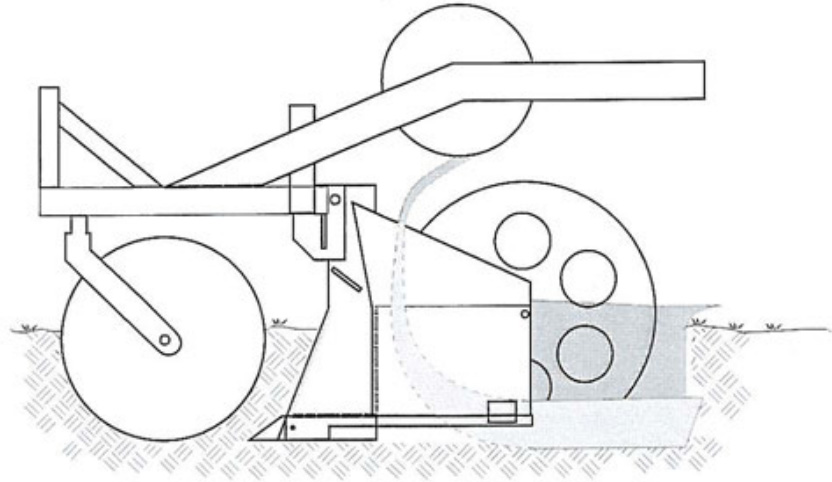
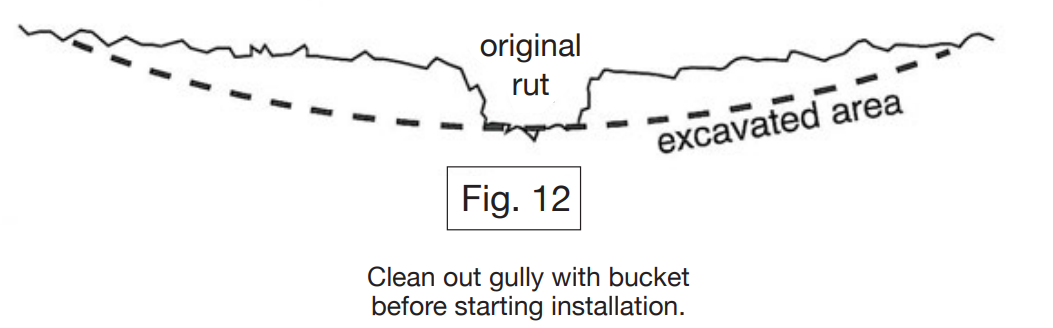
If there is an established gully 6” deep or deeper, we recommend opening the area with your loader so the Elston can install the fabric at the proper depth below the soil level. See Fig. 12 Above
Installing Silt Fence Through Adverse Conditions
The Elston works extremely well in sticky mud and very wet soil like wetlands, but you may have to pull the tractor and Elston through with another source of power from dry or stable ground. You can definitely install silt fence with the Elston where you can’t with any other machine.
The same is true for steep side slopes. When you lose traction on the high side wheel, you can pull the Elston through with another power source which holds the front end of the tractor from sliding down the hill and gives you traction for finishing the job–again installing where no other machine can operate!
In hard, compacted ground, you may have to manipulate the machine more than usual by using the lower arms of the 3-point to vary the depth vertically 2-3” in the soil. This reduces the resistance to the soil disrupter in the soil and allows the Elston to continue with a proper installation.
In nearly all conditions, we recommend 300 pounds additional weight on the machine. In extremely compacted conditions, in rocky soils, add another 100-150 pounds onto the Elston weight bracket to help it into the ground. In rocky soils the coulter can inadvertently act as a wheel, and hold the Elston up, restricting penetration. We recommend removing the coulter completely in these situations.
In very trashy soils, or in a grubbed area full of roots, you may have to drag the Elston through the area at the penetration angle to break up the soil, and then return and install the silt fence in the created slit. In this case, you would definitely want to double or triple compact the disrupted soil around and against the silt fence fabric.
On dips, curves, and turns we recommend the support person walking directly behind and on the disturbed soil to help secure the fabric immediately until final compaction is accomplished.
Plan which direction you are going to install silt fence so the tractor doesn’t end up dead headed into an area which will cause extra hand work. If the silt fence partially comes up out of the slit in the soil, sometimes you can tuck it back in with a spade without having to reinstall it
Support Posts
Contractors use all types of posts, from steel t-posts to 1 inch sq. hardwood posts. Steel t-posts cost more, but are very sturdy when deep enough, can be spaced as needed, and can be recycled. Wood posts are relatively inexpensive, but are hard to drive deep enough into the soil for good support, and present somewhat of a safety problem for labor when driven with a heavy hammer.
Posts are installed after the fabric is properly placed and compacted in the soil. EvTec found that compaction before posting significantly improved effectiveness. Posting independently allows the contractor to space posts as they are needed – where water concentrates posts are spaced closer together possibly at 3′ apart, and on legs with concentration 8′ apart.
Steel or wood? Doesn’t matter to a Elston installation. Wood posts are allowed or specified in many parts of the country, but as regulations and suppliers are now preparing silt fence to actually pond water and hold sediment, steel posts are likely to continue gaining presence.
Problem With Wood Stakes
If not sized appropriately, (actual 2×2) smaller sizes break while installing them. Properly sized wood stakes will perform acceptably, but their physical size (40 inches) prohibit achieving proper depth to support the horizontal load. Generally, stakes must lie as deep in the ground as the potential load above ground.
Wood Stakes may be less expensive than steel, but if the fence won’t hold up it doesn’t matter.
Providing 18″ of sediment and storm water is a major difference and benefit of proper installation by slicing with the Elston. The fabric doesn’t work out and inferior posts are no longer adequate (as in pre-fabricated silt fence).
Steel posts are often the best option. Steel posts can be driven the proper depth into very hard clay and even rocky soils. Steel posts can support the 18″ horizontal sediment load (when properly placed)… and can be recycled – often wood posts are not recyclable.
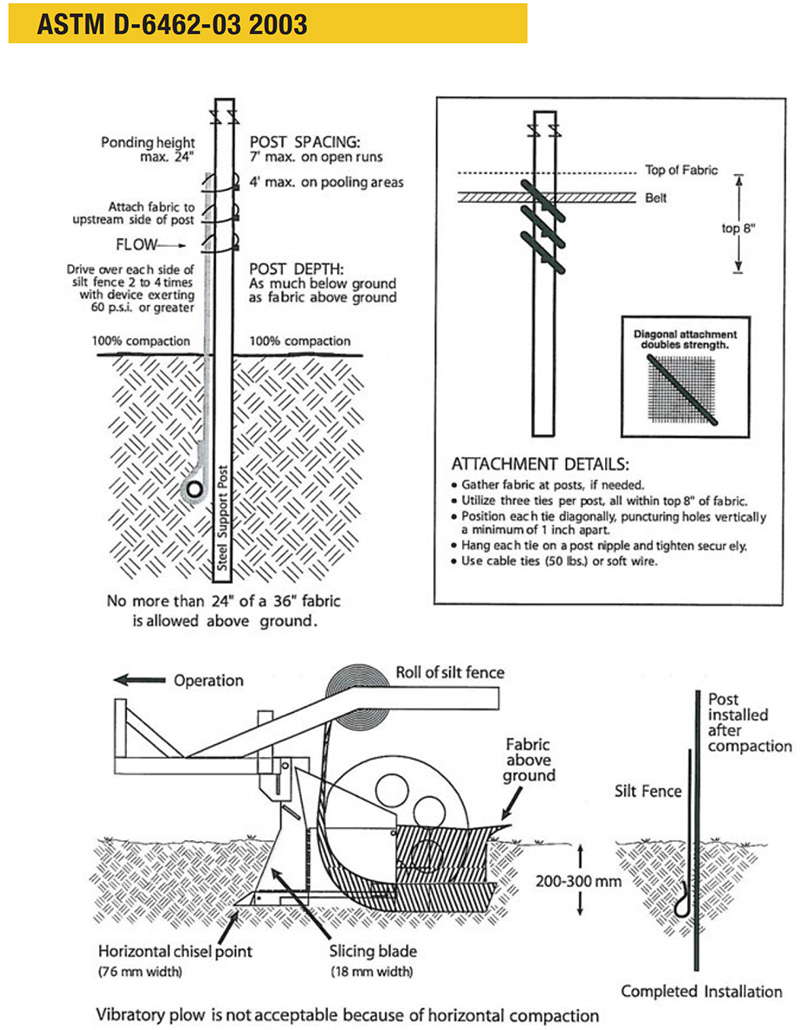
1. The base of both end posts must be at least 2-4” above the top of the silt fence fabric on the middle posts for ditch checks to drain properly. Use a hand level or string level, if necessary, to mark base points before installation.
2. Install posts 3-4ft apart in critical water retention areas and 6-7ft apart on standardapplications.
3. Install posts 24 inches deep on the downstream side of the silt fence, and as close as possible to the fabric, enabling posts to support the fabric from upstream water pressure.
4. Install posts with the nipples facing away from the silt fence fabric.
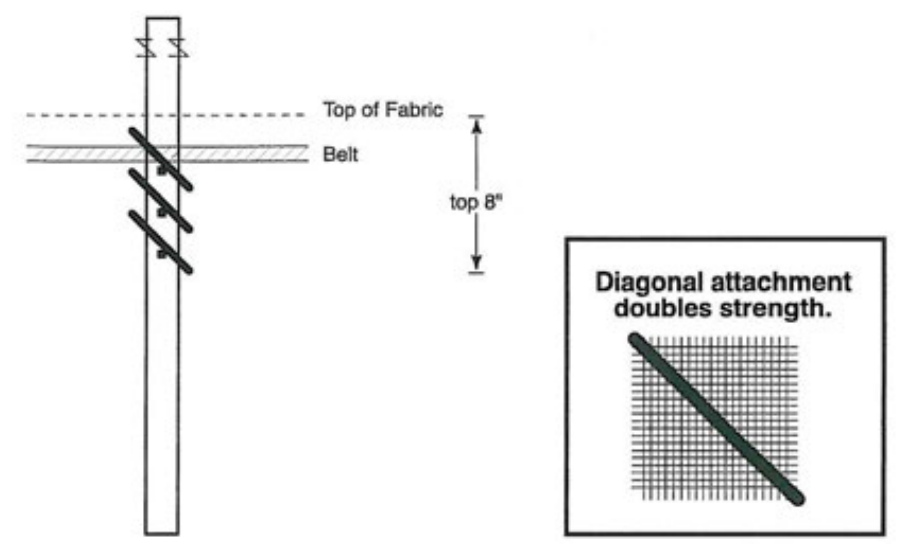
5. Attach the fabric to each post with three ties, all spaced within the top 8” of the fabric. Attach each tie diagonally 45 degrees through the fabric, with each puncture at least1” vertically apart. Also, each tie should be positioned to hang on a post nipple when tightened to prevent sagging.
6. Wrap approximately6 inches of fabric around the end posts and secure with 3 ties.
7. No more than 24” of a 36” fabric is allowed above ground level.
8. The installation should be checked and corrected for any deviations before compaction. Use a flat-bladed shovel to tuck fabric deeper into the slit if necessary.
9. Compaction is vitally important for effective results. Compact the soil immediately next to the silt fence fabric with the front wheel of the tractor, skid steer, or roller exerting at least 60 pounds per sq. inch. Compact the upstream side first, and then each side twice for a total of four trips.
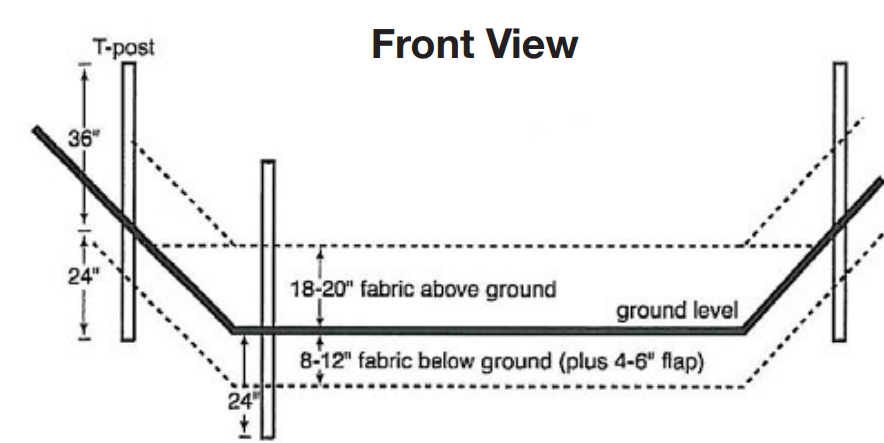
The base of both end posts must be 2–4” above the fabric on the middle posts for the silt fence to properly drain. Use string level when necessary.
Attachment To Steel T-Posts
• Triple tie silt fence to the post within the top 8 inches
• Position the post with the nipples facing away from the fabric
• Attach the silt fence to the support post with three ties (either 16 gauge wire, or 50 lb. cable ties – which you will need to snip to a point)
• Position each tie diagonally through the fabric with each puncture hole at least 1 inch vertically apart, attaching several horizontal threads for much greater strength
• Position each tie over a nipple and tighten to avoid slippage down the post
(Hint: Kneel on the post side of the fabric, puncture 1 inch below the desired post nipple and push tie through. Come back through the fabric slightly above the same nipple, and securely tighten the tie above and hanging on the nipple.)
We have found that proper attachment to the support post is extremely important to the whole system. Iowa probably has the greatest problem with silt because of our fine, clay soils and heavy rainfalls (both per storm and annually). We have seen the cheapest woven silt fence fill up and hold silt when attached properly to appropriately spaced support posts. In addition, silt fence attached with three ties have weathered two Iowa summers and one winter with virtually no failures regarding ties.
The Elston Vs Plows/Trenchers
Contractors want to know the difference between the Elston silt fence machine and silt fence plows. The Elston is a machine because it is engineered to achieve end goals of efficiency and quality installation in all conditions – slopes, sharp turns, and tight spaces.
Simply put, the Elston silt fence machine scientifically disrupts the soil into a pliable medium that will secure the silt fence fabric in the slice without an extra man holding it, in as with a silt fence plow.
A secure fabric installation prevents significant downtimes, lowers operating costs, and increases the hourly efficiency of your crews!
The Elston simply outperforms the plow for a comparable price with less manpower.
The plows drag through the soil like a 2 x 4, without design or regard to the end results. creating a compacted slice, resulting in silt fence fabric loosely installed. Why does that matter to a contractor? As you can see from the videos, in any condition other than a flat straight line, the plows need an extra man to help keep the fabric in the soil. And when the fabric pulls out in a turn or terrain change, it takes a lot of extra man hours to fix the installation – that means more time and higher costs!
Comparison Data
The results are in – using the Elston will improve your bottom line.
- The Elston eliminates one full man from payroll
- On average, 1 man can produce 1000-1250 linear feet per day
- For most businesses, a two man crew can meet your clients’ needs
Materials Costs
| Trencher | The Elston | ||||||||||||||||
|---|---|---|---|---|---|---|---|---|---|---|---|---|---|---|---|---|---|
|
|
- The Elston compared with prefab is $0.18/ft. cheaper to install
- But the significant difference is in the production results!
Productivity Impact
| Trencher | The Elston | ||||
|---|---|---|---|---|---|
|
|
Doubling the linear feet installed means halving the time spent at a client’s site, meaning you can service more clients in the same time with the same crew!
Time Savings
Where is the Exact Time Savings?
Many contractors are proud of their highly productive crews, and rightfully so considering their out-dated equipment. But the Elston technology eliminates so many labor factors there really is no comparison.
The greatest savings comes from the speed of the power vehicles. Whether using a tractor or a skid loader, slicing through the soil is between two to four times faster than excavating tons of soil. (before the trencher has gone 100’.)
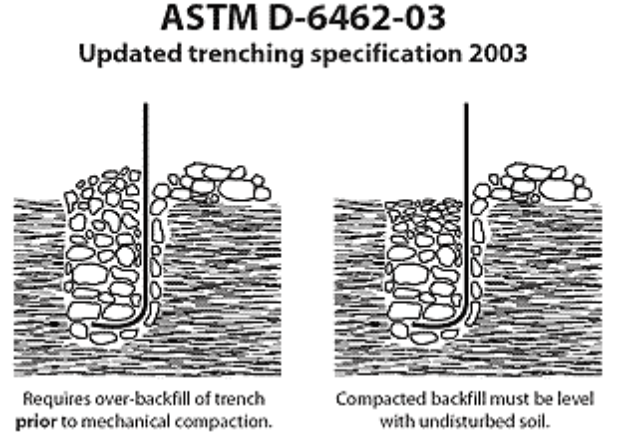
Eliminating the need to backfill is probably the second greatest time saver, especially when excavating in sod, saturated soils or sand. The 2003 ASTM specification requires over-backfilling the trench and mechanically compacting to a full level trench.
With The Elston There Are
- No joints to wrap together versus a joint every 100’
- No laborers battling the wind, billowing fabric, and sagging fence.
- No repositioning the trencher at every obstacle––plus, the fence upturns to create a smile layout.
- No truckload of 100 foot packets to carry, disperse over the site, open and unwind.
- Fewer employee problems and disheartened crews.
And finally, 2500 linear feet rolls of fabric eliminate hours of down-time for materials handling.
Erroneous Assumptions
Adding posts separately takes a lot more time. FALSE.
The Truth
Proven since Henry Ford made his first million dollars, production lines are more productive, and that is what you have with posting separately. Attaching fabric to posts is, in fact, the slowest part of the operation. But slicing is so much faster that neither of these two operations hinder the total performance compared to trenching.
EPA Verification
The Scientific Verification arm of the EPA – the Environmental Technology Verification Center – organized a panel of industry specialists and DOT directors, who designed and operated the verification protocol for a comparison of the Elston installation method and traditional trenching.
Their conclusion was that the Elston is 3-5 faster than the standard trench method, while producing “consistent, dependable results.”
New Specifications
- Trencher must be over-backfilled, mechanically compacted, and level full when completed.
- Smiles and J-hooks must be employed to pond water and sediment.
Problems With Trenching
- Cannot turn to install J-hooks and smiles now required in most SWPPP’s and ESC manuals
- So many locations where trencher cannot maneuver at all makes trenches not feasible
- Requires extra crew members
- Work-stoppage in wet conditions or complete inability to operate
- Slow and costly excavation
- Cumbersome backfill and compaction (leaving a half empty trench is not longer allowed)
- Expensive and frequent high cost maintenance with claims and hydraulics
- Moving chains and throwing rocks is hazardous to employees and increases insurance
- Incalculable lost profits from time lost and customers lost
- Expensive call backs from washed-out silt fence
- Poor visual installation if constructed on a windy day or with 10 feet post spacings
- Inability to service customers in a short time – either before a coming storm, after a significant storme, or between storms
- Al the extra cost with more employees – overtime, workman’s comp. payroll taxes (15%) insurance base on payroll, rainy days lost, etc.
Hassles Of Trenching
- Excavation in sod, rocky soil, wet conditions
- Trencher getting stuck in soft soils
- Hand-digging many locations
- Management of more employees
- Time-consuming over-lapping joints
- Lost partial rolls and needs for extra stakes
- Cannot maneuver around obstacles or trees
- Backing up and causing damages
| Weight | 570 lbs |
|---|